-
Back office guide
-
Login
-
Reset password
-
Home page
-
Users page
-
Employees page
-
Contracted customers page
-
Not contracted customers page
-
Add ticket form
-
Update ticket
-
Assign ticket page
-
Review ticket page
-
Audit ticket page
-
Close ticket page
-
Add sub product file page
-
Sub product file edit page
-
Add service records page
-
Waiting approval
-
Add service contract
-
Review and edit service contract
-
Response behavior template page
-
Audit ticket page
-
-
Back office guide - Declarations
-
Option-Declaration page
-
Option-General options-Employee department
-
Option-General option-Customer category
-
Options-General options-Unresolved ticket reasons
-
Options-General options-Telephone ip
-
Options-Location control-Area
-
Options-Location control-Sub area
-
Options-Location control-Zone
-
Options-Access level-System platform
-
Option-Access level-Role
-
Options-Access level-Add resources
-
Options-Access level-Permissions
-
Options-Product-Product category
-
Options-Product-Sub products
-
Options-Product-Contents
-
Options-Product-Parts
-
Options-Auto assign ticket
-
Options-Import file-Product category
-
Options-Import file-Sub products
-
Options-Import file-Customers
-
Option-Import file-Contents
-
Option-Import file-Parts
-
-
-
Mobile app - Service engineer
-
Chat page
-
Open service record signature page
-
Add approval request
-
Approval requests page
-
Not solved service record page
-
Open service record page
-
Accepted ticket page
-
Review ticket page
-
New ticket notification
-
Assigned tickets page
-
Dashboard page
-
Start page
-
Profile page
-
Change fonts page
-
Change color page
-
Change password page
-
Change email page
-
Settings page
-
Sign up page
-
Home page
-
Login page
-
Add employee form
Estimated reading time:
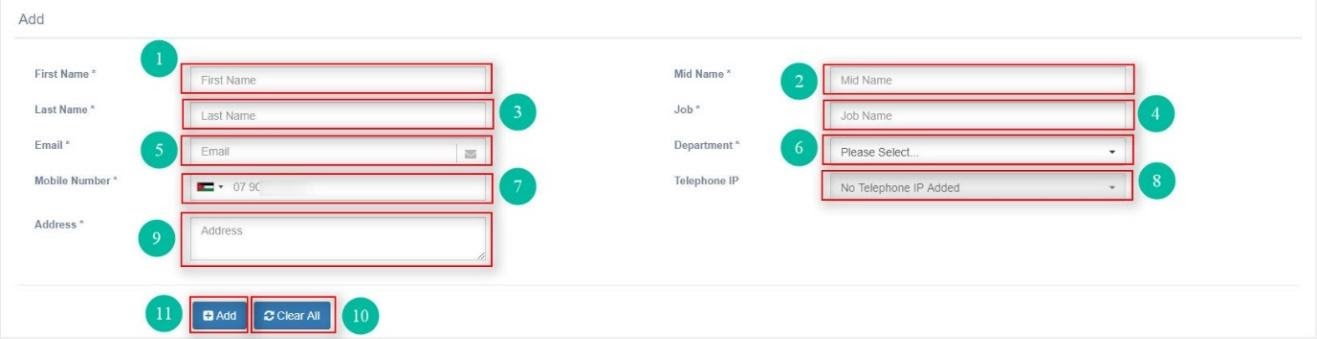
This is the add new employee form, here you can enter the employee information and add them to the system, adding a new employee to the system requires the admin to fill all the employee required information (Marked with "*").
This add form contains:
- The first name field: This is where the admin enters the new employee first name.
- The mid name field: This is where the admin enters the new employee mid name.
- The last name field: This is where the admin enters the new employee last name.
- The job field: This is where the admin enters the new employee job name.
- The email field: This is where the admin enters the new employee unique email address.
- The department drop down menu: This is where the admin chooses the new employee department from the menu displayed.
- The mobile number field: This is where the admin enters the employee mobile number and it should be unique and required.
- The telephone ip drop down menu: This menu contains the telephone IP.
- The address field: This is where the admin enters the employee address.
- The add button: This is the button which adds the new employee information to the system.
- The clear all button: This button clears all the entered information by the admin before.
Last update: 02/08/2021
Views: 529
In this page: