End of Zendesk Widget script
+962 (6) 4643896 Software@jocom.jo
0 Items
JOCOM Software
  • Software
  • Products
    • Ecommerce
    • Fixed Assets
    • Ticketing
    • Customer Feedback
  • Odoo ERP
  • Services
  • Customers
  • Support
  • About Us
    • Careers
    • Contact Us
  • English
    • العربية
Select Page
  • Software
  • Products
    • Ecommerce
    • Fixed Assets
    • Ticketing
    • Customer Feedback
  • Odoo ERP
  • Services
  • Customers
  • Support
  • About Us
    • Careers
    • Contact Us
  • English
    • العربية
  • Mobile Portal

    • User Guide

    • Fixed assets mobile application

    • Login

    • Home page

    • Side bar

    • Add item page

    • Scan page

    • List page

    • Search Page

    • Transfer to web

    • Check tag page

    • Settings

    • Dashboard

  • Web Portal

    • Search

    • User Guide

    • Fixed assets website system

    • Login page

    • Forgot password page

    • Dashboard page

    • Users

    • Manage assets book

      • View book assets
      • Manage assets items
      • Add assets
      • Import assets
      • Manage assets
      • View asset information
      • Assets wrong location
    • Settings

    • Profile

  1. Docs
  2. Assets Tracking - RFID
  3. Mobile Portal
  4. Check tag page

Check tag page

Estimated reading time: ~2 min read


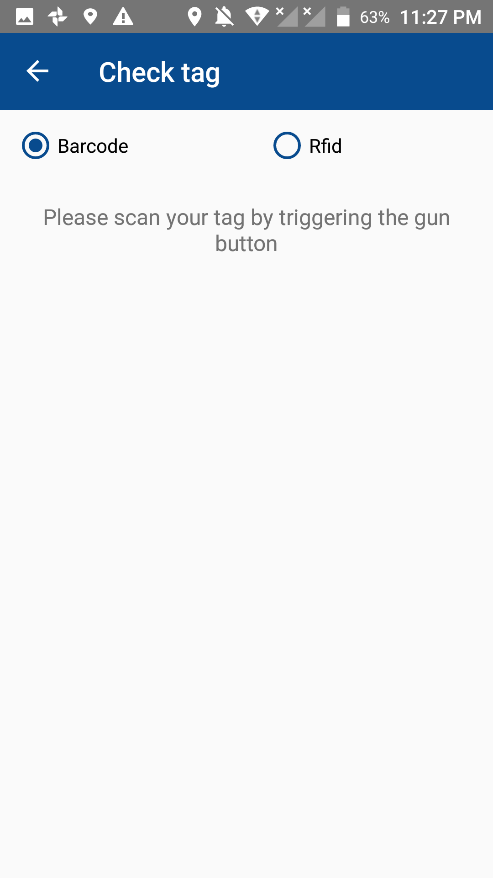
To get the information of an asset item that’s located in a specific place, the user needs a feature to check the tag and retrieves the information of that tag when he’s in a cost center, the check tag page is all about reviewing the information for that specific item.

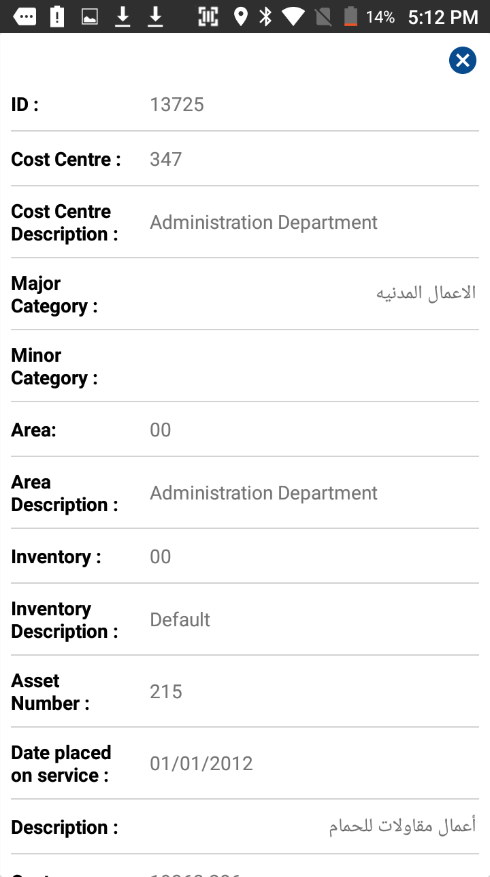
The user here can pick whether he wants to check a barcode tag or RFID tag, then he can just scan it using the reader device. After scanning the item, the system will validate the scanned item if it’s identifiable of not, if it is identifiable and was found, the system will display the information of the item for the user.

This check tag page will contain the followings:

1.      Back icon button: this button is used to return to the home page of the application.

2.      Barcode and RFID check boxes: these check boxes define whether the user is going to scan an RFID or barcode tag.

3.      Hint message field: a hint message to tell the user how to scan the item’s tag.

4.      Asset item information dialog: this disalog is displayed after scanning an asset item barcode or RFID tag, this dialog will show the full information for the selected asset item.

Last update: 01/17/2021
Views: 421
How do you feel about this article ?
0 0 0
In this page:
    © 2024 JOCOM , All rights reserved
    Open chat